Building a Christmas Matching App with Blazor WASM, Azure Static Web Apps and Azure Functions
Introduction
This blog post is part of the Festive Tech Calendar 2024.
Christmas is a time when many people gather to share meals and create lasting memories. Unfortunately, some individuals face loneliness during this festive season, while others have an extra seat at their table. To bridge this gap, I built a simple web application that connects families with spare seats to people seeking companionship, enabling them to share the warmth of Christmas together.
While it would have been possible to create this application using a simple Blazor App with server-side rendering (requiring minimal code), I wanted the development process to be enjoyable and educational. For this reason, I opted to build it using Azure Static Web Apps, Blazor WebAssembly, Azure Functions, and CosmosDB.
To further enhance productivity, I utilized GitHub Copilot Workspace as an experiment. This version of Copilot is still in private preview, but I’ll share some insights and code snippets with you.
Azure Static Web Applications
Modern web applications are often built as Single Page Applications (SPAs), which do not require a server to run server-side code. The web server’s main role is to host the static files (HTML, CSS, JavaScript) needed to run the application. Since WebAssembly is also static code, it’s a logical choice to use Azure Static Web Apps instead of a full Azure App Service. For this project, I used a code-first approach with Blazor WebAssembly, which is ideal for .NET developers.
Step 1: Create the Blazor Web Application
Start a new project: Open Visual Studio and select “Create New Project” (Figure 1).
Select the template: Choose “Blazor WebAssembly Standalone App” (Figure 2). The default Blazor App does not work well with the Static Web App approach.

Figure 2: Blazor template Project options: Rename the project to “Client” and give the solution a meaningful name (Figure 3).
Additional information: Leave the default options and use .NET 9 for this project (Figure 4). The authentication type will be left to None for this demo. Using a different option would require to share keys and I don't want that in this demo.
Figure 4: Additional information
Note: Standalone WebAssembly apps don't work well out of the box with .NET Aspire, so I opted not to use it. To keep this app simple, I excluded authentication, although it would be necessary in a real application.
Once the project is created, you’ll see some basic code (Figure 5). Running the application displays the default pages known to most Blazor developers (Figure 6).
 |
| Figure 5: Generated code |
 |
| Figure 6: Running default app |
Step 2: Add the Code to GitHub
Azure Static Web Apps work seamlessly with GitHub as a source code repository. Visual Studio has excellent support for this, so I will have VS do this for me (figures 7 and 8).
 |
| Figure 7: Add code to GitHub |
 |
| Figure 8: Deployed code |
Step 3: Create an Azure Static Web App
Create a new resource: In the Azure Portal, create a new “Static Web App” (Figure 9).
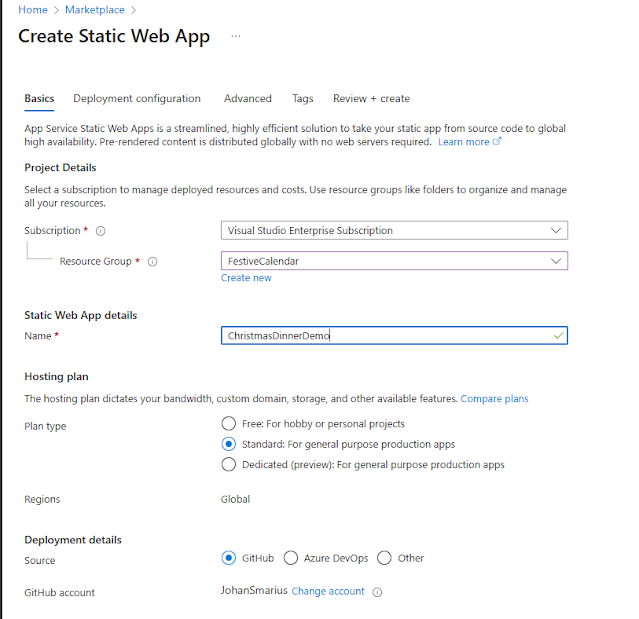
Figure 9: Static Web App Set up the resource: Choose a resource group, name the app, and select the “Standard” plan (Figure 10). For simple applications, the Free option is a great choice and a lot cheaper 😉. For this demo, this would be enough. But just to show the options, I choose to use the Standard plan for now.
Figure 10: Setup Static Web App Link the repository: Connect it to the GitHub repository and select the correct branch (Figure 11). The created Blazor app was named Client, so the name for the app location matches. If you use a different name for your app, you need to update this setting. There is no API yet, so this setting can be left empty.
Figure 11: Source Code Deployment settings Set locations: Use the default “App location” or choose a region near you (Figure 12). Since I live in The Netherlands, I choose West Europe.
Figure 12: Location setting Review and create: Click “Review” and “Create” to complete the process (Figure 13).
Figure 13: Review and create
Once the resource is created, the site will be empty until the deployment is complete (Figures 14 and 15).
 |
| Figure 14: Resource view |
 |
| Figure 15: Running empty app |
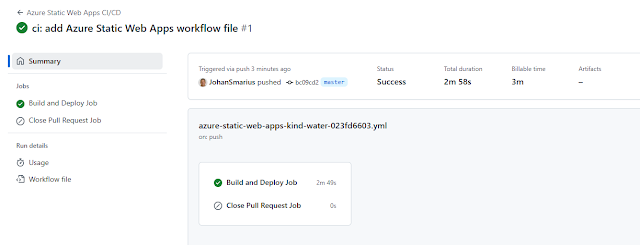
Azure also creates a GitHub Actions file to automate deployments (Figures 16 and 17).
 |
| Figure 16: Workflow file |
 |
| Figure 17: Action status |
Once the job finishes, you’ll see the default app running (Figure 18).
 |
| Figure 18: Running app |
Step 4: Add an API to the Solution
Create an API project: Add a new Azure Functions project to the solution (Figure 19) and name it “Api” (Figure 20).
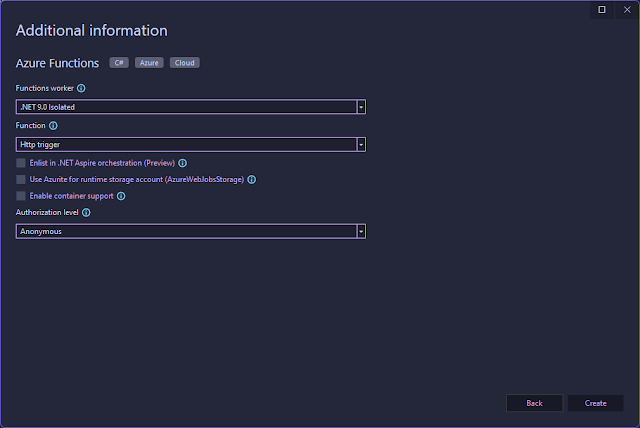
Figure 19: Template choice Figure 20: Name API to default name Additional information: Select .NET 9 and use the “Anonymous” authentication level (Figure 21). The other options require the exchange of keys and for this demo, I do not want to do this.
Figure 21: Additional information for the API Link the API: Update the GitHub workflow to include the API (Figure 22) and add CORS settings in
local.settings.jsonfor local development (Figure 23). During local development, the function runs as a separate process and without the CORS settings, the Blazor app would not be able to communicate with the API.Figure 22: API in workflow file Figure 23: Updated CORS setting in the API project Deploy the API: Push the changes to GitHub, and Azure will automatically link the API to the Static Web App (figure 24).
Figure 24: Linked api
The Azure Function is not available on its own (figure 25).Figure 25: Recent resources in the Azure Portal
Step 5: Add a Family to the App
 |
| Figure 26: Family and Guest code |
The Family class will be used as a document to store in CosmosDB. This class does need an ID for this. The Guest will be an embedded resource, so this class does not need an ID. The casing of ID is deliberately chosen as lower case, to avoid conversion problems with JSON serialization. CosmosDB requires this field to be lowercase.
Step 6: Set Up CosmosDB
Create a CosmosDB account: In Azure, create a new CosmosDB resource with NoSQL as the database type (Figure 27).
Figure 27: CosmosDB API choice Configure the database: Choose the serverless option for a cost-effective setup (Figure 28).
Figure 28: Options Create a database and container: In the Data Explorer, create a database and a container (Figures 29 and 30). The container is used to store the documents (JSON-files) in.
Figure 29: Create options Figure 30: Database and container created
Step 7: Connect Azure Functions to CosmosDB
Install the package: Add the
Microsoft.Azure.CosmosNuGet package to the Functions project.Register the CosmosDB client: Use the connection string from the Azure portal (Figures 32 and 33). In production code the connection string should of course be stored as a secret or in Azure Key Vault.
Figure 32: Connection string Figure 33: Registering service Service class: The function code should be kept as minimal as possible. Therefore a Service is included in the code to handle the communication with the database. The client is injected in this class. The container is needed however to add or change items (figure 34).
Figure 34: Injected client and container In this service class methods are added to get all families (figure 35) and to add a family (figure 36). Because this function is used for both insert and update, the existence of the key must be checked.
Figure 35: Get all families Figure 36: Add a family The match between the family and the guest is made based on the town they both live in. You could of course handle this in the Blazor app, but it is more clear to do this in the API (figure 37). CosmosDB supports a SQL-like syntax for this.
Figure 37: Filtering by town. These functions can now be used to implement endpoints in the Function code (Figures 38, 39, and 40). The endpoints do not adhere to the REST structure. Because this API is only used by the Blazor app, this is not a problem.
Figure 38: Get families Figure 39: Add family Figure 40: Find family by town In the function code, we do need some code to register the guest with the family (figure 41). This information is passed in a separate class SinglePerson (figure 42).
Figure 41: Register the guest Figure 42: Single person code
Step 8: Register the Function with the Blazor App
Add a setting only for development. Create a file in the www-root folder named appsettings.Development.json and add a key with the URL of the local function address to it (figure 43)
Figure 43: Development setting Modify startup settings: Update the
HttpClientinProgram.csto switch between local and Azure environments (Figure 44) based on the existence of this setting.Figure 44: HTTP client config
That is all the code that is needed on the backend to support the Blazor application.
Step 9: Build the Pages
Add a Family: to be able to add a family, we just need a form with all the properties except the guest list of course (figure 45).
The code for this page just has to send the information to the injected HttpClient (figure 46).Figure 46: Sending new family info Show Families: showing families just means showing a list of families and retrieving these from the API (Figures 47 and 48).
Figure 47: List of families Figure 48: Fetching the families Register as Guest and Match: A guest can register and directly choose a family with an open spot. In a real-world app this matching process would be far more complicated, but just to show the technology this is more than enough (figures 49 and 50). The available families are retrieved when a guest presses a button.
Figure 49: Edit form for guest. Figure 50: Code for retrieving families and register as guest
Running Application
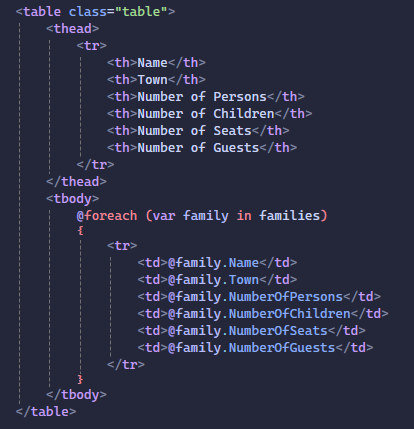
When the app runs, it displays the available families (Figure 51) and allows users to match guests with families (Figure 52).
 |
| Figure 51:All families |
 |
| Figure 52: Choose a family as a guest. |
And for desert
 |
| Figure 53: Issue |
On the page for the issue, I choose the option to open this in Workspace (figure 54).
 |
| Figure 54: Workspace option |
Workspace will now open up and start analysing my current situation (figure 55) and the desired situation (figure 56).
 |
| Figure 55: Current situation |
 |
| Figure 56: Proposed situation |
 |
| Figure 57: Generated plan |
 |
| Figure 58: Generated code |
 |
| Figure 59: Create pull request |
During the build phase for the pull request, a staging environment is automatically created. This allows me to test the new functionality in isolation, before merging it into my main branch (figures 60 and 61).
 |
| Figure 60: Link to staging environment |
 |
| Figure 61: Running change |
This entire change took me about 5 minutes. Far faster than I could have built it on my own.
Fundraising
Conclusion
By using Azure Static Web Apps, Blazor WebAssembly, and Azure Functions, you can create lightweight, cost-effective single-page applications. Adding CosmosDB for NoSQL storage is simple, and GitHub Copilot (especially Copilot Workspace) can greatly increase productivity. All the code from this blog post is available here.
Enjoy the Holidays!
If you have questions or want to discuss technical topics, feel free to reach out to me on Twitter or BlueSky.


Comments
Post a Comment